My plant pots? Yeah, they’ve seen better days.
Every summer, I tell myself I’ll add a little color to my space, but somehow, my pots end up looking the same—plain, boring, and definitely not as fun as they could be.
But not this time!
If your plant pots could use a little glow-up too, I’ve got you covered. These 10 DIY pot painting ideas are so easy, super cute, and the perfect way to add some personality to your space. Whether you’re into bright, bold patterns or soft, beachy vibes, there’s an idea here for you.
Grab your paintbrush, pick your favorite design, and let’s turn those plain pots into summer statement pieces!
number 1
How to Make It:
-
Pick Your Colors: Choose two colors that go well together. One will be the original mug color, and the other will be the paint.
-
Tape the Line: Use painter’s tape to mark off where you want the paint to stop. This helps create a neat, straight edge.
-
Paint the Top Half: Use acrylic or outdoor-safe paint to cover the upper part of the mug. Let it dry completely. You may need two coats for a smooth look.
-
Seal It: To protect your design from sun and rain, apply a clear, waterproof sealant.
The two-tone look adds a stylish touch to any space. Since the mugs are painted on the upper half, they create a unique color contrast, making them stand out as decorative pieces. You can choose soft pastels for a calm vibe or bright colors for a fun, summery feel.
What You Can Use It For:
-
Mini Planters: Perfect for succulents, small flowers, or herbs.
-
Garden Decor: Place them around your patio, balcony, or outdoor table.
number 2
How to Make It:
-
Paint the Pot: Start by painting your pot light yellow. Use acrylic paint and let it dry completely.
-
Pick Your Stickers: Choose fun, colorful stickers in different shapes like stars, hearts, flowers, or summer things like suns and ice cream cones.
-
Stick Them On: Place the stickers all over the pot. You can make patterns or just put them randomly for a fun look.
-
Protect Your Design: To keep the stickers from peeling off, brush on a clear sealant like Mod Podge. This will help your pot last longer.
The yellow color feels like sunshine, and the colorful stickers make it fun and unique. You don’t need to be good at painting to create something awesome!
What You Can Use It For:
-
Plant Holder: Great for flowers like daisies or little succulents.
-
Kids’ Craft Project: A great summer activity for kids to be creative.
number 3
number 4
How to Make It:
-
Choose Your Paints: Pick bright rainbow colors—red, orange, yellow, green, blue, and purple. Use acrylic or outdoor-safe paint.
-
Prep the Pot: If the pot is rough, sand it lightly. Then, apply a white base coat so the colors pop. Let it dry completely.
-
Paint the Rainbow:
-
Striped Design: Use a brush or sponge to paint horizontal or vertical stripes.
-
Blended Look: Blend the colors smoothly for a gradient effect.
-
Swirls or Dots: Create a fun, unique pattern with different rainbow elements.
-
-
Seal It: Once dry, apply a waterproof sealant to protect it from weather.
Rainbow colors bring positivity and make any space feel fun and cheerful. The mix of colors creates a lively summer vibe that stands out in any garden or home.
number 5
How to Make It:
-
Paint the Base: Start by painting the entire pot in sage green. Use acrylic or outdoor-safe paint and let it dry completely.
-
Create the Sunflowers:
-
Middle Dots: Use a small brush or the back of a paintbrush to add yellow dots around the pot.
-
Petals: Around each yellow dot, paint simple white petal shapes. Keep them slightly uneven for a natural look.
-
-
Final Touches: Once the flowers are dry, you can add tiny details like shading on the petals or a subtle white highlight on the yellow center.
-
Seal It: Apply a waterproof sealant to protect the design from fading or chipping.
The white sunflower petals make the design feel light and fresh, while the yellow centers add a warm, summery touch. It’s simple yet eye-catching, perfect for those who love nature-inspired decor.
What You Can Use It For:
-
Small Plant Holder: Great for succulents, herbs, or tiny flowers.
-
Table Decor: Adds a stylish touch to desks, shelves, or windowsills.
-
Gift Idea: A lovely handmade gift for plant lovers.
-
Outdoor Accent: Looks beautiful on patios, balconies, or garden spaces
number 6
How to Make It:
-
Paint the Base:
-
Paint the top rim of the pot in light purple.
-
Paint the body of the pot in grey. Let both colors dry completely.
-
-
Paint the Flower Design:
-
Use a thin brush to paint a green stalk on the body of the pot.
-
Add white and light purple petals around small yellow or green centers to create the flowers.
-
You can make a single flower or multiple flowers for a fuller look.
-
-
Final Touches:
-
Add tiny leaves or soft shading for extra detail.
-
Once dry, seal the pot with a waterproof sealant to protect the design.
-
This pot has a soft, delicate feel with its mix of light purple and grey. The color combination is elegant yet playful, and the floral design adds a natural, fresh touch. It’s perfect for those who love a simple yet artistic look.
What You Can Use It For:
-
Small Plant Holder: Perfect for succulents, lavender, or daisies.
-
Indoor Decor: Looks great on shelves, desks, or windowsills.
number 7
How to Make It:
-
Paint the Base:
-
Paint the top rim of the pot in a fresh green color to mimic strawberry leaves. You can make the edges wavy for a more natural look.
-
Paint the body of the pot in bright red. Let both colors dry completely.
-
-
Add the Strawberry Details:
-
Use a thin brush or the back of a paintbrush to add small yellow dots evenly across the red body. This will create the look of strawberry seeds.
-
(Optional) Lightly outline some dots with a tiny brown or black shadow for extra depth.
-
-
Final Touches:
-
If you want, add small highlights to the green rim to make it look more leaf-like.
-
Once dry, seal the pot with a waterproof sealant to protect the design.
-
The bright red and green colors bring a fruity, cheerful vibe, and the small yellow dots make it look just like a real strawberry. It’s a fun way to add a pop of color to any space.
What You Can Use It For:
Small Plant Holder: Great for herbs like mint or tiny flowers.
number 8
How to Make It:
-
Paint the Base:
-
Paint the body of the pot in dark yellow. Let it dry completely.
-
Paint the upper rim in the same dark yellow or leave it slightly textured for a rustic look.
-
-
Add the Vine Design:
-
Start at the bottom of the pot and paint a green vine moving upward. You can make it slightly curved for a natural flow.
-
On the upper rim, paint another vine that moves towards the middle of the pot’s body, giving a wrapped effect.
-
(Optional) Add small leaves or tiny swirling tendrils along the vines for extra detail.
-
-
Final Touches:
-
Once the vines are dry, you can lightly highlight them with a lighter green to give them depth.
-
Seal the design with a waterproof sealant to protect it.
-
The simple yet elegant vine design makes it feel fresh and organic, perfect for those who love nature-inspired decor.
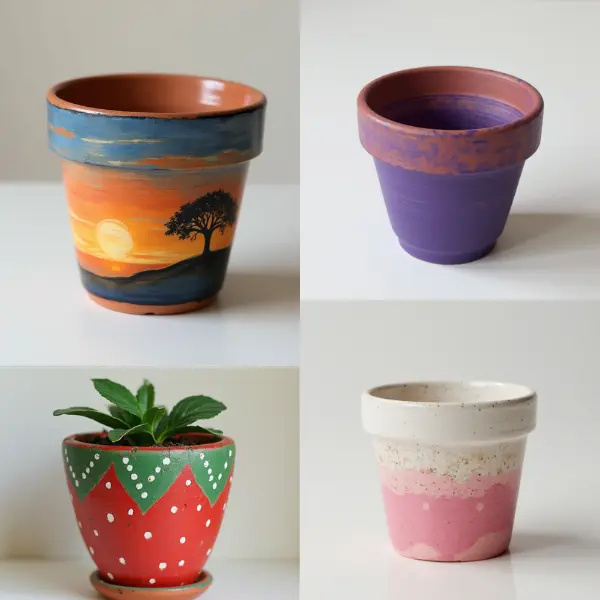
number 9
How to Make It:
-
Paint the Base Layers:
-
Upper Rim: Paint it dark blue or deep purple to represent the night sky. Let it dry completely.
-
Middle Section: Blend soft pinks to create dreamy clouds.
-
Bottom Section: Use shades of yellow and orange to create a warm sunset effect.
-
-
Add the Details:
-
Night Sky (Upper Rim): Use a thin brush or a dotting tool to paint small white stars, a crescent moon, and fluffy white clouds.
-
Pink Clouds (Middle Section): Blend soft, rounded cloud shapes with a sponge or brush for a dreamy effect.
-
Yellow Sunset Clouds (Bottom Section): Add soft golden-yellow clouds that fade into the sunset color at the base.
-
-
Final Touches:
-
Blend the colors softly where the sections meet for a smooth transition.
-
number 10
How to Make It:
-
Choose Your Shades: Pick at least three to four shades of pink, ranging from light blush to deep magenta.
-
Paint the Gradient:
-
Start with the lightest pink in the top left corner of the pot.
-
Gradually blend into medium pink as you move toward the center.
-
Use darker pinks and bright magenta toward the bottom right corner.
-
Use a sponge or a dry brush to blend the colors smoothly. Work in soft, circular motions to create a seamless gradient effect
-
This pot has a modern and stylish look with its flowing gradient of pink tones. The soft transition from light to dark makes it visually appealing and gives it an elegant, artistic feel. The diagonal color shift adds movement and makes it stand out.